


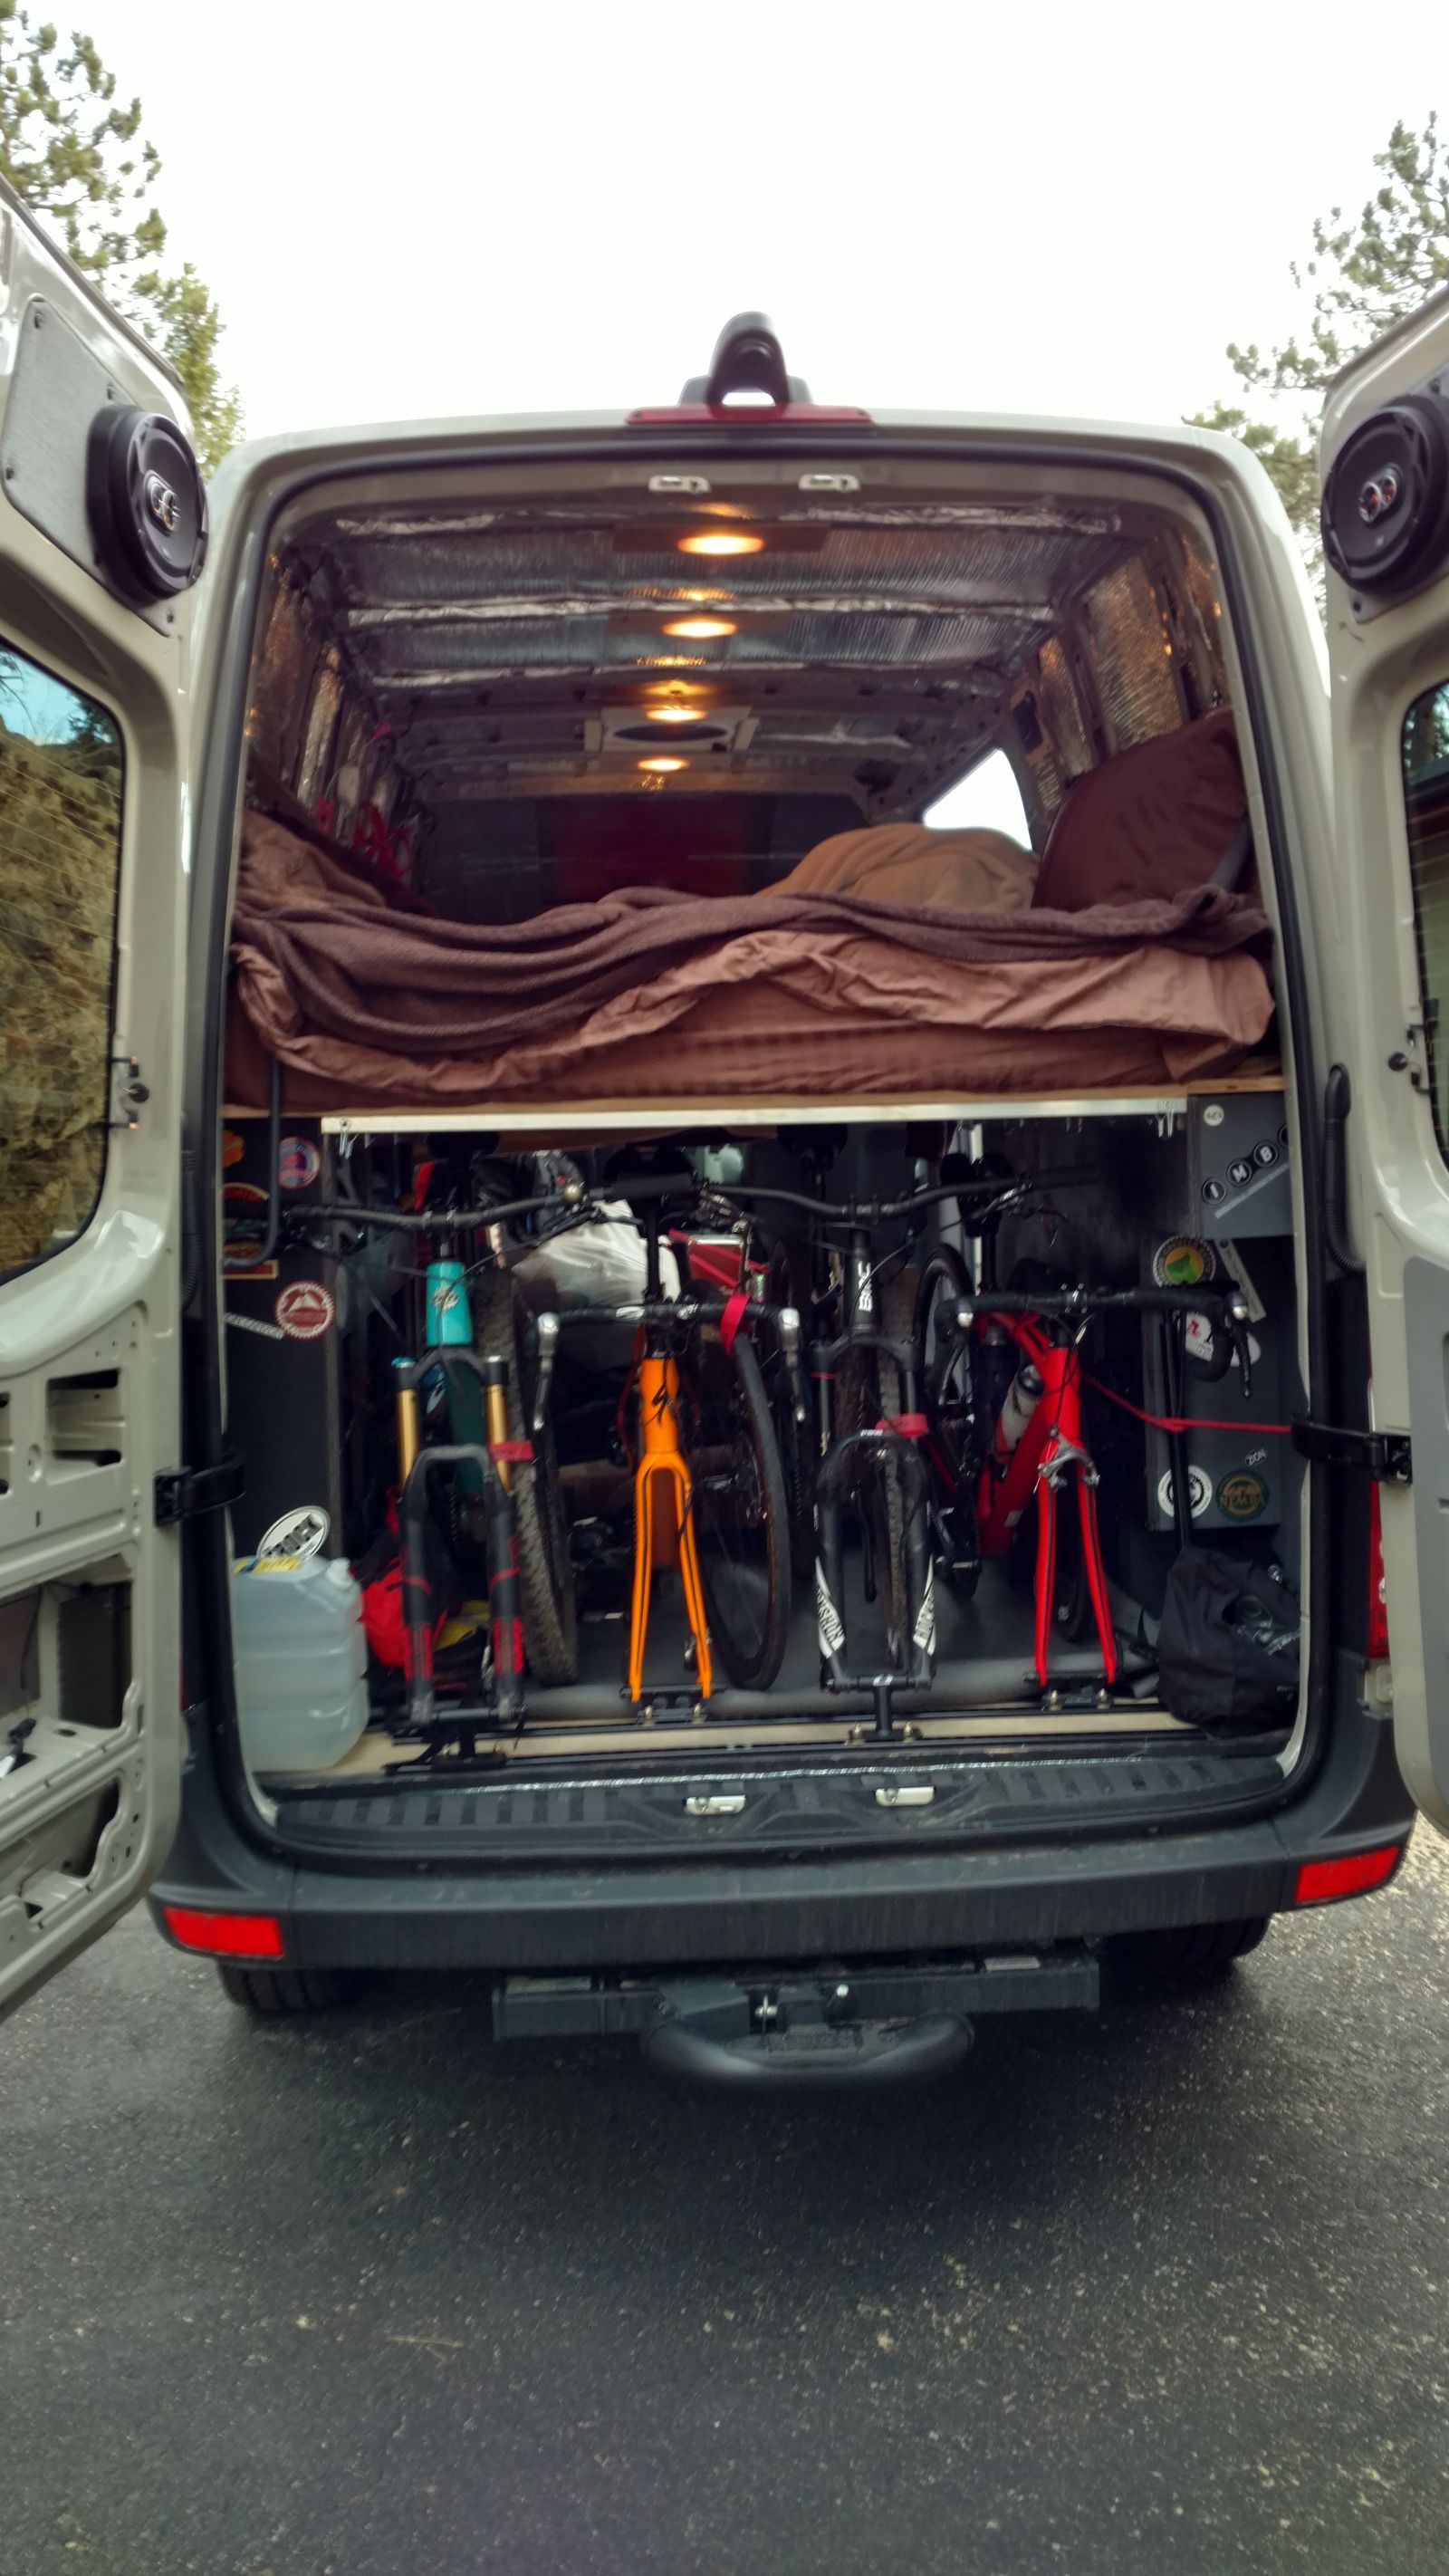
	<p>This is the first major step to making the van livable. The plan is for a &#8220;garage&#8221; with storage for 4 bikes inside and all the necessary biking gear with a nearly queen size bed above.</p>
<p>The thinking is that the wheel wells need to be fully enclosed and covered to keep this source of noise to a minimum. With these boxed in, it seemed to make sense to continue the wheel well structure up to the level of the bed platform and make storage cubbies in them.</p>
<figure id="attachment_1089" aria-describedby="caption-attachment-1089" style="width: 5344px" class="wp-caption alignnone"><img src="https://ridingroadsandtrails.files.wordpress.com/2017/04/img_20170211_114359756_hdr.jpg" alt="IMG_20170211_114359756_HDR" width="5344" height="3006" /><figcaption id="caption-attachment-1089" class="wp-caption-text">Mocking out the wheel well enclosure.</figcaption></figure>
<p>The back-plane of the storage cabinet is attached to the van using Rivnuts.</p>
<figure id="attachment_1092" aria-describedby="caption-attachment-1092" style="width: 5344px" class="wp-caption alignnone"><img src="https://ridingroadsandtrails.files.wordpress.com/2017/04/img_20170219_153620395.jpg" alt="IMG_20170219_153620395" width="5344" height="3006" /><figcaption id="caption-attachment-1092" class="wp-caption-text">Installing Rivnuts using a Astro 1442 riveter</figcaption></figure>
<p>The holes in the van walls are slightly too small for the 1/4-20 Rivnut, so it needs to be drilled out precisely with a 23/64&#8243; drill bit.</p>
<figure id="attachment_1086" aria-describedby="caption-attachment-1086" style="width: 5344px" class="wp-caption alignnone"><img src="https://ridingroadsandtrails.files.wordpress.com/2017/04/img_20170211_104926733.jpg" alt="IMG_20170211_104926733" width="5344" height="3006" /><figcaption id="caption-attachment-1086" class="wp-caption-text">When drilling anything in the van, you must have a &#8220;stop&#8221; on your drill bit so you don&#8217;t end up drilling through the van! Tape works.</figcaption></figure>
<p><a href="http://www.pointsunknown.com/blog/2016/10/lessons-learned-rivnuts-vs-plusnuts/" target="_blank" rel="noopener">Here is a discussion on Rivnuts vs Plusnuts</a> Even after reading this and the comments associated to the article, I decided to use Rivnuts due to the lower cost and smaller footprint.</p>
<p>A key element to the design of the storage cabinets is to ensure that they are removable. This means the bolts in the cabinets must be accessible when the cabinets are in place. This is what drove the selection of the pre-existing holes in the van which are used for the rivnuts. Additionally, the somewhat unconventional cabinet shape allows access to the floor tie down anchors.</p>
<figure id="attachment_1093" aria-describedby="caption-attachment-1093" style="width: 5344px" class="wp-caption alignnone"><img src="https://ridingroadsandtrails.files.wordpress.com/2017/04/img_20170220_123749662.jpg" alt="IMG_20170220_123749662" width="5344" height="3006" /><figcaption id="caption-attachment-1093" class="wp-caption-text">Gluing the wheel well enclosure</figcaption></figure>
<figure id="attachment_1094" aria-describedby="caption-attachment-1094" style="width: 687px" class="wp-caption alignnone"><img src="https://ridingroadsandtrails.files.wordpress.com/2017/04/img_20170220_162553998_hdr.jpg" alt="IMG_20170220_162553998_HDR" width="687" height="387" /><figcaption id="caption-attachment-1094" class="wp-caption-text">A dry fit with the bikes and cubby storage.</figcaption></figure>
<p>The storage cabinet is all constructed with 3/4&#8243; plywood with each piece screwed and glued. The overall height of the cabinet allows clearance for the bikes with the front wheels off when the bed platform is in place.</p>
<figure id="attachment_1097" aria-describedby="caption-attachment-1097" style="width: 5344px" class="wp-caption alignnone"><img src="https://ridingroadsandtrails.files.wordpress.com/2017/04/img_20170305_125140493_hdr.jpg" alt="IMG_20170305_125140493_HDR" width="5344" height="3006" /><figcaption id="caption-attachment-1097" class="wp-caption-text">A test fitting of the face board before all the cutouts are cut out.</figcaption></figure>
<p>The cutouts in the face place are accomplished by doing plunge cuts with a circular saw and the corners finished with a jigsaw.</p>
<figure id="attachment_1200" aria-describedby="caption-attachment-1200" style="width: 3188px" class="wp-caption alignnone"><img src="https://ridingroadsandtrails.files.wordpress.com/2017/04/img_0081.jpg" alt="IMG_0081" width="3188" height="2541" /><figcaption id="caption-attachment-1200" class="wp-caption-text">Cutting steel angle iron, AKA how to ruin a dust catcher.</figcaption></figure>
<p>The storage cabinet is completed and painted with some terrible paint.</p>
<p>The next thing is the supports for the bed platform. This is 2&#8243; x 2&#8243; x 3/16&#8243; angle iron with 2&#8243; x 3/16&#8243; flat bar as a backer plate all of which is through bolted. This is done in 3 sections to support each of the 3 pieces of bed platform.</p>
<figure id="attachment_1102" aria-describedby="caption-attachment-1102" style="width: 5344px" class="wp-caption alignnone"><img src="https://ridingroadsandtrails.files.wordpress.com/2017/04/img_20170319_182803225.jpg" alt="IMG_20170319_182803225" width="5344" height="3006" /><figcaption id="caption-attachment-1102" class="wp-caption-text">Driver&#8217;s side storage cabinet is in place.</figcaption></figure>
<figure id="attachment_1105" aria-describedby="caption-attachment-1105" style="width: 3006px" class="wp-caption alignnone"><img src="https://ridingroadsandtrails.files.wordpress.com/2017/04/img_20170325_170051259.jpg" alt="IMG_20170325_170051259" width="3006" height="5344" /><figcaption id="caption-attachment-1105" class="wp-caption-text">Section 1 of 3 for the bed platform.</figcaption></figure>
<p>The bed platform is made up of 3/4&#8243; plywood reinforced with 1&#8243; x 1&#8243; aluminum square tubing that is screwed and glued at the edges. The placement of the aluminum tubing is such that it fits between the angle iron sections to prevent any fore and aft or side to side motion.</p>
<figure id="attachment_1113" aria-describedby="caption-attachment-1113" style="width: 3006px" class="wp-caption alignnone"><img src="https://ridingroadsandtrails.files.wordpress.com/2017/04/img_20170326_115727323.jpg" alt="IMG_20170326_115727323" width="3006" height="5344" /><figcaption id="caption-attachment-1113" class="wp-caption-text">Dry fitting the bed platform.</figcaption></figure>
<p>To improve the look of the platform, we wrap the section in <a href="http://amzn.to/2nupz0N" target="_blank" rel="noopener">speaker box carpet</a> which improves the finished look and helps keep things quiet.</p>

<p>The speaker box carpet is glued to the platform panels with the <a href="http://amzn.to/2nXXuuM" target="_blank" rel="noopener">3M spray adhesive 90</a>.</p>
<p>To prevent the platform panels from bouncing on rough roads or for any other reason, removable pins are installed in the ends of the aluminum tubing beneath the angle iron.</p>
<p>One lesson here is that the holes for the pins in the aluminum tubing should have been drilled before attaching to the plywood for easier access by the drill. Not doing this left us with sloppier holes. No one likes a sloppy hole!</p>
<figure id="attachment_1214" aria-describedby="caption-attachment-1214" style="width: 1693px" class="wp-caption alignnone"><img src="https://ridingroadsandtrails.files.wordpress.com/2017/04/img_20170408_181300764.jpg" alt="IMG_20170408_181300764" width="1693" height="1919" /><figcaption id="caption-attachment-1214" class="wp-caption-text">Pins holding the panels in place in case of any bouncing.</figcaption></figure>
<p>Now that we have a platform, we need a mattress to rest upon it. One of the big motivators for the van was the ability to have a comfortable bed. We&#8217;re big fans of the Tempurpedic mattress that we spent thousands of dollars on that we have at home and we will settle for no less comfort! We were hesitant to pay full price for the Tempurpedic for the van since we will have to cut it to size. After many hours of searching online for the mattress for the van, we found this <a href="https://www.amazon.com/gp/product/B00MWTJGDE/ref=as_li_tl?ie=UTF8&;camp=1789&;creative=9325&;creativeASIN=B00MWTJGDE&;linkCode=as2&;tag=ridingroadsan-20&;linkId=61d2ebd2c6aaac6b8dbf5ae3363a582f" target="_blank" rel="noopener">Memory Foam Mattress</a> for about $200. It comes in a relatively small box. We unrolled it and set it on the deck for a few days to allow for the chemical smell to dissipate. Many of the reviews talk about the chemical smell. A few days outside resolved that for us. It feels slightly different than our beloved Tempurpedic, but equally comfortable for less than 10% of the price.</p>
<figure id="attachment_1115" aria-describedby="caption-attachment-1115" style="width: 3006px" class="wp-caption alignnone"><img src="https://ridingroadsandtrails.files.wordpress.com/2017/04/img_20170326_122727404_hdr.jpg" alt="IMG_20170326_122727404_HDR" width="3006" height="5344" /><figcaption id="caption-attachment-1115" class="wp-caption-text">The mattress is easily cut with an electric carving knife.</figcaption></figure>
<figure id="attachment_1119" aria-describedby="caption-attachment-1119" style="width: 3006px" class="wp-caption alignnone"><img src="https://ridingroadsandtrails.files.wordpress.com/2017/04/img_20170330_183031778_hdr.jpg" alt="IMG_20170330_183031778_HDR" width="3006" height="5344" /><figcaption id="caption-attachment-1119" class="wp-caption-text">All loaded up for the inaugural trip, a weekend in Moab!</figcaption></figure>
<p>Materials:</p>


	<font size="5"><strong>
<a target="_blank" href="https://www.amazon.com/gp/search?ie=UTF8&;tag=ridingroadsan-20&;linkCode=ur2&;linkId=71dbf898dd3b7ccc0678f284b1f3d842&;camp=1789&;creative=9325&;index=automotive&;keywords=sprinter campervan" rel="noopener">Support our website by shopping on Amazon with this link</a> <img src="//ir-na.amazon-adsystem.com/e/ir?t=ridingroadsan-20&;l=ur2&;o=1" width="1" height="1" border="0" alt=""/> </strong>
</font>

DIY Sprinter Van – bed and bike storage
Bike storage in the garage