<p>It has been 2 weeks since we received the Sprinter, we&#8217;ve been using it as a daily driver to get used to it and discover any problems that might be lurking. I&#8217;d also like to get through the 1000 mile break-in period for the drive train.</p>
<p>The first thing I noticed when driving is that I felt like I am inside a bass drum from the vibrations that are occurring with all the sheet metal. The longer the drive, the more irritating this became for me. Installing sound deadening material to the interior skin of the van will be the first project.</p>
<p>The next thing I notices is that seating position is up really high with a nice view over most of the traffic. The side view mirrors are a decent size, but the smaller, lower fish-eye mirror is really great once adjusted properly. Our van also has the factory backup camera, this is pretty terrible. This camera has odd aberrations in that it makes objects that are next to the van look like they are under the van. It also does not show more than a few feet behind the van. I use it only to see if there are additional objects that I cannot account for in the side view mirrors. Therefore, where with my other vehicles I primarily rely on the camera and secondarily on the mirrors, with the Sprinter, the camera is secondary to the mirrors for backing up. In general, it turns out the visibility and blind spots are not an issue for driving the Sprinter. However, replacing the factory backup camera with a better aftermarket camera is on the to-do list.</p>
<p>Engine power is good, although I have not had a load in it yet, but I have driven up some decent inclines like Floyd Hill on I-70 and Squaw Pass Road and had no problem keeping speed without the need to press on the accelerator very hard. You are not supposed to gun the engine during the break-in period, so it is good that there has been no need to so far. The transmission shifts feel solid but may be a little slow compared to my other vehicles. More than 5 speeds in the transmission would be nice. The manual shifting is nice and easy, which is convenient when coming back down the hills to avoid riding the brakes.</p>
<p>The radio and speakers are truly awful and will be replaced soon. We also need satellite radio since we can&#8217;t get good FM or AM signal in the mountains. The new after market head units with Android Play look like a capability I would like to have as well.</p>
<p>The bi-xenon headlights are really great on the dark twisty mountain roads at night, especially the high-beams. It seems the cornering lights are installed but deactivated on Sprinters in the US and you need to reprogram the computer to activate these lights. I&#8217;ll be looking into this and will post if I find more.</p>
<p>The sliding door can be tough to close completely if all the other doors and windows are closed. I&#8217;ll take it that the van is relatively air tight. If a window or other door is open, this is a non-issue.</p>
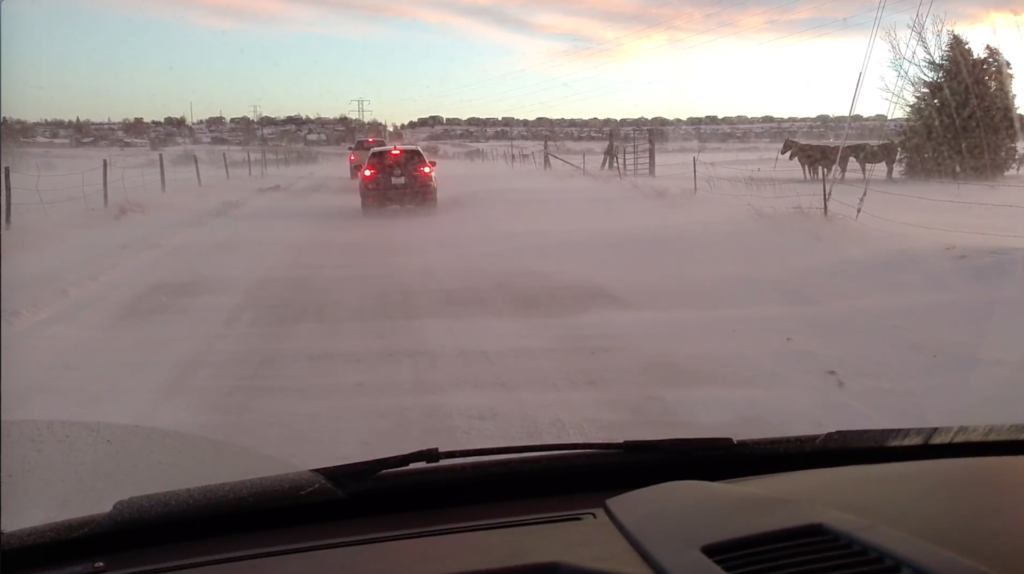
<p>On my way home from work on the first day with the new van, I found the need to engage 4wd. There was a strong sidewind blowing snow on one of the back roads causing ice and when I got there, cars were spun out and ditched all along the road. Traffic was stopped, giving me a chance to engage the 4wd and I managed to weave through the carnage (not pictured) without any loss of control. It was disappointing to learn that you can&#8217;t engage 4wd while in motion. <a href="http://sprintervanusa.com/2016/08/25/four-wheel-drive-in-a-sprinter/" target="_blank" rel="noopener">Some detail on the 4wd system</a>.</p>
<p><img class="alignnone size-full wp-image-331" src="https://ridingroadsandtrails.files.wordpress.com/2017/01/screen-shot-2017-01-02-at-11-28-19-am.png" alt="screen-shot-2017-01-02-at-11-28-19-am" width="2172" height="1218" /></p>
<h1></h1>
<h1>Starting on the build</h1>
<p>There are a ton of resources on the web for folks doing conversions on their own and plenty of upfitters willing to do it for you. There are a million decisions to make.</p>
<p><a href="http://sprintervanusa.com/how-to-convert-a-van/" target="_blank" rel="noopener">Here is some great background info with lots of links to more great resources.</a></p>
<p>As I mentioned above, sound deadening is the first modification to make so that driving will be more pleasant. There are lots of opinions and choices of materials, but in the end, I chose to follow this write-up because it was middle of the road in cost and effort:</p>
<p><a href="http://www.pointsunknown.com/blog/2015/12/our-very-own-sprinter-adventure-van-part-iii-sound-deadening-insulation/" target="_blank" rel="noopener">Sound deadening and insulation</a></p>
<p>But first, since we have a Crew Van, we need to remove the head liner along the whole van, which was a little more challenging than we expected. The links below are super helpful, I kept going back to these as we were doing ours.</p>
<p><a href="https://sprinter-source.com/forum/showpost.php?p=435764&;postcount=12" target="_blank" rel="noopener">Headliner removal (check out the whole thread as well)</a></p>
<p><a href="http://www.pointsunknown.com/blog/2015/12/pointsunknown-adventure-van-part-iv-removing-the-headliner/" target="_blank" rel="noopener">More headliner removal info</a></p>
<p><a href="https://www.youtube.com/watch?v=rOAUqVOo65w" target="_blank" rel="noopener">Youtube video removing the front headliner</a></p>
<p>A point to highlight on the headliner removal. After removing the A-pillar and B-pillar covers, there is another cover above the doors that connects the A and B pillar covers. This does not get removed, instead the headliner must be wrestled from behind these remaining 2 covers after everything else is removed.</p>
<p>Once the headliner was out, I knew that it would be a while before we either replaced the factory headliner or built our own, so I made temporary light mounts so the ceiling lights wouldn&#8217;t be swinging around when driving. I traced the hole in the original headliners onto some luan, jigsawed it, installed a couple rivnuts into each metal beam. The rivnuts required the existing holes to be drilled out slightly. Also, be sure to put several layers of tape on your drill bit to use as a stop to prevent hitting the outside skin and denting or puncturing it with the drill bit.</p>
<p><img class="alignnone size-full wp-image-462" src="https://ridingroadsandtrails.files.wordpress.com/2017/01/luanlightmounts.jpg" alt="luanlightmounts" width="3006" height="4043" /></p>
<p>The mount for the front light was tougher to do since the hole in the original headliner is 3D. Also, the piece of luan had to be bigger to reach the mounting screws on the sun visor which I used to hold up the luan mount.</p>
<p><img class="alignnone size-full wp-image-406" src="https://ridingroadsandtrails.files.wordpress.com/2017/01/img_20161230_133045194_hdr.jpg" alt="img_20161230_133045194_hdr" width="2283" height="851" /></p>
<p>So now the headliner is out and the loose bits are secure, it is time to install the sound deadening material.</p>
<p>I used 80mil Noico sound deadening material. It is super easy to cut with a utility knife and a straight-edge. I used a drywall square as a straight edge. Installing the large pieces is just like hanging wallpaper and the small pieces are even easier. The only real tip I can offer is to not remove the paper backing all at once, just peel back from the top edge, adhere the top edge to the wall of the van section you are covering and then with the piece aligned nicely, slowly peel the backing paper from behind the piece of Noico with one hand and smooth the piece against the van with the other to ensure you don&#8217;t trap any air.</p>
<p>To validate that I was really getting a benefit from the Noico, I would install on a section on the van and take the van for a drive. I tried to record the noise level with my cell phone, but the microphone on it is not sensitive enough to add any value. Anyway, to my ear, with each new section of Noico installed, the bass drum effect was reduced. Once complete, it is still a loud vehicle to drive, but MUCH more pleasant.</p>
<p><img class="alignnone size-full wp-image-429" src="https://ridingroadsandtrails.files.wordpress.com/2017/01/img_20170102_131542961.jpg" alt="img_20170102_131542961" width="5344" height="3006" /></p>
<p>In total, I used about 80 square feet of 80 mil Noico. This was well worth the $150 and about 6 hours of install time.</p>
<figure id="attachment_332" aria-describedby="caption-attachment-332" style="width: 2824px" class="wp-caption alignnone"><img class="alignnone size-full wp-image-332" src="https://ridingroadsandtrails.files.wordpress.com/2017/01/dsc_5834.jpg" alt="dsc_5834" width="2824" height="2427" /><figcaption id="caption-attachment-332" class="wp-caption-text">Sprinter on Squaw Pass</figcaption></figure>

Sprinter first impressions and first modification