

Perishable food storage is always a concern on road trips. We've been using an Engel rotomolded cooler for a while. This worked well, with ice lasting several days. However, the lack of a good organization system for food in the cooler and the fact that food is always wet from melting ice led us to decide to upgrade to a refrigerator.
Refrigerator Selection Process
There are a number of decisions to make when selecting a refrigerator for the van. These include:
- Form factor (chest, drawer, or front door)
- Power (propane, AC, DC, or a combo)
- Mounting location
- Size
Once these decisions are made, you can narrow down which makes and models satisfy your requirements.
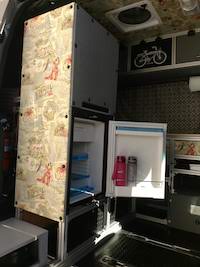
The form factor and mounting location was easy for us to decide since we already have our side-slide mini kitchen which has been working well for us. Our main requirement was that the refrigerator is accessible when using the kitchen. The best option for our layout was to mount a front door, right-hinge refrigerator directly on top of the side-slide kitchen housing with the door facing the front of the van. This placement allows access to the refrigerator while outside cooking as well as from inside the van with the sliding door closed.
Power Source
We decided on the AC/DC combination power since we are already set up with 12v DC in the van and having the option to plug into AC when it is available seemed attractive.
Sizing
The cooler that we had been using was 50 quart capacity and we felt that the fridge should be just a little bit bigger to accommodate space for air circulation inside the fridge.
Refrigerator Brands
There are a number of trusted refrigerator brands for the marine and RV market including Engel, Dometic and NovaKool. After a good amount of online research, I had selected the Dometic CRX-80. The reasons for selecting this model included the form factor, size, removable freezer section and overall quality of the shelves and door mechanisms.
Purchasing
Purchasing the Dometic turned out to be more difficult than anticipated. It turns out that this particular series of refrigerators from Dometic is sold through their trucking division which limited the number of retailers that could supply this unit. Some of the retailers were confused by their inability to get this unit from Dometic which made the purchase process take longer than expected. Eventually, I did find suppliers and got quotes that ranged from $699 to $1500 for the identical unit. The best price being from Panther RV Products. Panther's reviews are generally positive, but there were a number of complaints about them not having products that they claim to have in stock. I decided to place my order via phone so that I could verify that they really really really had the fridge in stock. When they took the order, they verified that they had 2 units in stock and I would get shipping info in a day or 2 and would have the unit within a week. After a few days with no word, I called to follow up. They checked and found that they were out of stock and would have to drop-ship from Dometic. This took an additional 3 weeks with missed ship dates and incorrect tracking numbers, but I finally did receive the fridge in perfect condition. If I knew that all these delays and miscommunications were going to happen, I might have paid more to use a different supplier. In the end, I did get the right unit for a great price.


The Build
Now that we finally had the refrigerator in hand, it is time to build it into the van. With our previous success using the 8020 aluminum extrusions for our upper cabinet it made sense to build this cabinet in the same way.
The first thing we had to do was to remove the original enclosure for the side-slide kitchen and replace it with an enclosure made with 8020 so that we'll have a solid, yet extensible, base for the refrigerator.


Mounting the Refrigerator
The refrigerator is mounted just above the side-slide kitchen and the frame is integrated into the kitchen enclosure creating one large structure. The refrigerator frame also includes enclosures above the refrigerator for additional storage.
Connecting the refrigerator flange to the 8020 extrusion required a little creativity since the intended mounting holes do not line up with the 8020 slot. Instead of using the front face of the flange to connect it to the 8020 extrusion, I made holes in the side of the flange and connected it to the 8020 using T-Slot nuts and bolts. This is possible because the refrigerator door leaves a good size gap between it and the side of the flange. I also added 8020 cross-struts that line up with the 4 refrigerator feet for additional support from below.
The sides, top and bottom of the refrigerator are wrapped in an additional layer of Thinsulate insulation to add to its efficiency. The area around the compressor is kept very clear with plenty of airflow into the garage area to ensure efficient thermal transfer.


Electrical
The refrigerator can be powered by either 120v AC or 12v DC. It has a rectifier circuit that automatically switches to AC power when AC is available, so if you choose, you can leave DC power connected even when you have AC available.
No special circuit is set up for AC, the refrigerator is positioned so that the AC power cord on the back of the refrigerator is accessible to plug in when appropriate.
We already have a small 12v DC electrical distribution setup in the van which is powered by the factory 100ah auxiliary battery. The BlueSea fuse block still has plenty of empty slots. I ran a wire from the fuse block to a switch and then to the refrigerator and that was that.
While building the cabinet that is replacing the previous temporary electrical cabinet, we also chose to upgrade the inverter to a fanless 300W Morningstar inverter which is more efficient and much quieter.

Cabinet Side Panels
The side panels and partitions for all the cabinetry is the same as we've been using all along. They are either 1/8" or 3/8" plywood with closed cell foam glued with 3M 90 Adhesive and then wrapped with material designed for outdoor furniture. The thickness of the plywood is chosen based on location and whether any strength is necessary for the place it is used.
The panels are either attached to the 8020 extrusion using t-slot nuts and bolts or is just positioned in the 8020 slots and held in place with friction.

More Insulation
One last layer of thermal defense for the refrigerator is a magnetic "cozy" for the front door which is made from reflectix, magnets and more fabric. This provides insulation and blocks direct sunlight coming in through the windows from heating up the black refrigerator.


Cabinet top
This is another one of the build components that is done as a temporary solution until we figure out exactly what we want in terms of both functionality and aesthetics. Functionally, the choices are a fixed top with drawers underneath the top or flip-up sections in the top with bins underneath the top. Aesthetically, we were thinking Corian countertop or butcher block since they are both fairly lightweight and pleasing enough to look at.
The initial implementation is the flip-up sections made from 3/4" plywood. The flip-up sections are supported with terrible hinges and decent gas props. So far, this is working well and likely will be the final implementation only with better materials.

Silverware Storage
After installing the new cabinetry, organization of all the stuff that we carry needed to be revisited. One challenge was a holder for silverware. We couldn't find anything that wasn't overly big for what we needed. We only need slots for forks, knives and spoons. This is when my son offered to print a storage container for us. What a concept!


