

UPDATE: Be sure to check out the new low profile Unaka Gear Co fork mount reviewed here: DIY Sprinter Van - Unaka Gear Company Thru-Axle Fork Mount
UPDATE: Be sure to check out the new low profile bike slider storage tray design here: DIY Sprinter Van - Low Profile Bike Slider Storage Tray
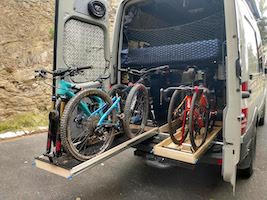
The interior layout of the van has always been designed around the ability to store 4 bikes inside. Initially, they were all mounted with fork mounts staggered on L-Track facing the rear of the van as documented here: DIY Sprinter Van - Bike Mounts and here: DIY Sprinter Van - Bed and Bike Storage This generally worked well, but as we started taking longer trips and carrying more stuff, we needed to improve space efficiency. The best way to gain this efficiency in the back of the van is to store the bikes front-to-back so they can be very close to each other without touching.
Fork mounts facing the front of the van presents another problem with reaching it from the back of the van. This is where the sliding tray comes to the rescue. I first saw this solution on the Traipsing About site before we even owned the van.

Locking Sliders
I have previous experience with the heavy duty locking sliders from building out our slide-out kitchen. You can get them on Amazon here but I ended up getting them from another supplier Unaka Gear Co. A couple things to note when shopping the sliders. Be sure to get the locking feature so that things don't go moving about when you are driving. Also, the stated weight capacity of the sliders is usually based on the 18" length slider, not the 60" slider that we'll be working with here. Bottom line, don't expect to be able to stand on the bike tray when it is fully extended. Lastly, most of the sliders of this length and weight capacity are non-disconnecting, so you need to plan the install appropriately, more on that later.
Sizing the bike tray
The first thing to tackle is to determine the dimensions necessary to fit your bikes efficiently on the tray. My approach to this was to mount a couple pieces of L-Track to some scrap wood and put the fork mounts on the L-Track and arrange the bikes on the garage floor front-to-back. I targeted the tray width to match the pedal to pedal distance where the pedals could overhang the sides of the tray but not beyond. Another key dimension to take into account is the handlebar width, ensuring that the handlebars of the bikes can clear the door frame and do not conflict with anything else built into the back of the van.
The overall width came out to be 20" for the mountain bike tray and 17" for the road bike tray. The length is 60", although the road bike tray could have been shorter.
Constructing the tray
The tray itself is a simple box with no lid. We have the length & width determined by the arrangement of the bicycles. The height is determined by the width of the sliders, which is 3". For a prototype, I milled true 1"x3" planks out of 2x4 studs. The bottom of the tray is 3/8" plywood. I made lap joints for the corners with the table saw and a dado blade pack. Each of the 4 side pieces are dado'd for the plywood bottom. This is all glued and pin nailed together. This was acceptable for a prototype, but the pine was just too soft to work with. The second tray was constructed all the same except with maple 1x4 which I had cut down to a 3" width and left the 3/4" dimension alone. The maple was much easier to work with and looks much better.

Bike slider tray finish
For the floor of the tray, I glued in some leftover vinyl coin flooring.

Bike slider tray installation
When installing the sliders it is important to ensure that there is no inward or outward pressure on the slider. The outer mounts for the sliders must be the precise distance apart for the tray width or the sliders will not slide smoothly. In my case, this was not tough to do since only one side is mounted to a fixed object and the other side was attached to the floor as the last step of assembly. The existing storage cabinet is the outer mounting point. The slider is screwed into this cabinet first with the slider resting on the floor and as far back in the van so that the lever does not hit the back door when closed. Next, the tray is screwed to the extension part of the slider that is attached to the cabinet. The tray should be shimmed slightly off the floor before attaching to the slider so that it does not drag after installation. The second slider that is toward the center of the van is mounted to an additional 60" x 3" x 3/4" piece of maple. The bottom of this board and the bottom of the slider should be aligned with each other. Before mounting this board to the van, attached the extension part of the slider to the tray. Again the tray should be shimmed off of the floor before attaching the slider to provide the space between the floor and the tray so the tray does not drag when sliding. The last step is to mount the inner slider support to the van. This may vary depending on your van floor material. We have 3/4" birch plywood flooring and screwed directly into this with corner brackets.

Bike Mounts
Update: See the post regarding the new low-profile bike mounts from Unaka Gear Co.
The positioning of the fork mounts varies for the different bikes. The road bikes need much more forward clearance for the handle bars. The mountain bikes need more lateral clearance for the width of the handle bars. We also anticipate the need to mount guest bikes, so being able to move the fork mounts "on the fly" is also necessary. Our prior bike storage system had the fork mounts attached to lengths of L-Track so they could easily be moved. We were happy with the flexibility this offered so we used the same mounting system on the trays. The MTB tray has the L-Track on top of the ends of the tray. The road bike tray has the L-Track mounted 6" in from each end of the tray. The difference is due to the position of the handle bars on the MTBs versus the road bikes.
My favorite fork mount type is the Rocky Mount Hotrod because it has swappable sleeves for the various different fork standards, making it easier to carry guest bikes. We've used a number of different mounts including the Delta Cycle and Kuat Dirtbag.


Bike Tray Modification
A way to gain a little more vertical space for the mountain bikes was to lower the end supports of the MTB tray so the fork mount would be 2 inches lower. I cut out the top 2 inches of the support and there seemed to be no loss of strength in the tray and the bikes are just a little easier to get in and out.

Materials and tools:
(6) 1" x 4" x 8' maple
(1) 4' x 8' x 3/8" sheet plywood
60" heavy duty locking sliders
Thanks for this. I’m building a bike and/or dometic slide out. I’m curious how you attached your bike slide outs to/thorough the floor. I’ve got the factory wood under a 1/2″ plywood sub floor. Ideally I’d just screw through all of this and not through bolt the sheet metal. It will work, but I’m worried about the slide having too much leverage on the floor and pulling out/breaking flooring. Do you have any thoughts here?
Hi Erik – I screwed the outside drawer slides to the side cabinets which are very securely connected to the van. This gave me the secure anchoring that I needed. The inside drawer slides are connected to the 3/4″ plywood subfloor with about a half dozen L brackets and 3/4″ wood screws. There has been no evidence of movement. In your case, if you have no secure attachment points and you don’t want to thru-bolt, I would take a sheet of 1/2″ plywood and connect a 10′ piece of wood with 5′ attached to the plywood with L brackets and 1/2″ screws and 5′ overhanging the plywood and then stress test to see what kind of load it can handle without pulling the screws out of the plywood. Once you found an adequate connecting method, add 50% more strengthening to consider aging & vibration. With all that said, thru-bolting is still the best method.
Pingback: Measure Twice, Cut One - Blonde in Braids