

Seat swivel upgrade
One of the first upgrades we made to the van was a seat swivel to improve the use of interior space of the van for when we are not driving. You can read about that first experience here: https://ridingroadsandtrails.com/swivel-seat-install/
The original swivel upgrade worked fine, but the increased seat height was awkward, especially being vertically challenged folks as we are. We adapted by adding a teak shower mat to raise the level of the floor. This was fine for the passenger seat but would not work for the driver seat. So we just stuck with a single swivel seat.

Then, one day while perusing Instagram, we saw this post from one of our favorite Instagrammers, @OurLibertyVan showing a new seat swivel on the market with a very low overall profile.

After seeing this post, we looked into this swivel some more and found only positive feedback. We sent an email to Alpine Mechanisms and got on the waiting list for a pair of swivels. After a few weeks, we got the call that the swivels are available. Since Luftcraft/Alpine Mechanisms is within a couple hours of home, I arranged to pick them up instead of having them shipped.

The visit was very worthwhile, the folks at Alpine Mechanisms are super nice and enjoyed talking about their van builds as well as hearing about our experience so far. They are also very proud of their swivel and offered any and all support, if needed.
With the swivels in hand, the first impression is that they live up to the feedback we saw. The construction is very sturdy and clean. The simple swivel mechanism and counter-sunk bolts are the design features that achieve the very low profile.


Installation
The accompanying installation instructions are mostly very well done.
Seat belt mount
The anchor of the seat belt is mounted to the seat. Due to this, the seat belt would be in the way when the seat is turned if the seat belt anchor is not mounted to another location. The Alpine Mechanisms swivel provides a mount for the seat belt anchor on the bottom plate of the swivel so that the seat belt can remain stationary when the seat is turned. One of the tips in the instructions is to attach the seat belt anchor to the mount before attaching the swivel to the pedestal for easier tool access...definitely follow this advice or you won't be able to get a wrench in to tighten the bolt. (ask me how I know)

Seat swivel install
Installing the swivel onto the pedestal is very straight-forward, unless the bolt holes on the swivel do not match up with the threaded bolt holes on the pedestal. This can be due to the pedestal being out of square. This is easy enough to remedy. With the seat and swivel out of the way, loosen the 4 pedestal mounting bolts just a little. 2 bolts are inside the pedestal, one is outside on the back of the pedestal and one is outside toward the center of the van. With these bolts loosened, bolt the swivel into place. This will move the pedestal enough to get it to align properly with the swivel without bending anything. Then remove the swivel and tighten the 4 pedestal mounting bolts. Now you can install the swivel to the pedestal. Be sure to use a torque wrench as the recommended 35 ft-lbs is a lot of torque.


Seat skirt trimming
Before the seat can be mounted on the swivel, the plastic skirt that covers the seat tracks needs to be cut down so that it does not interfere with the swiveling action of the seat. The instructions show using masking tape to mark the proper height and this worked well. I used a Dremel oscillating saw to make the cuts which made easy work of this.

Once the seat skirt is trimmed, installation of the seat onto the swivel is pretty straight forward. Again, be sure to use a torque wrench on the bolts.

Hook up the seat wires
The last piece, at least for the passenger seat, is to reconnect the wiring harness connectors that were disconnected when you took the seat out. The hole in the swivel is big enough the you can get a hand in to fish out the connectors from within the pedestal in case you forgot to hold them out when mounting the swivel. The connectors themselves are very different from each other so it is unlikely that you can hook anything up wrong. The number of connectors you have will depend on the options you have in your van. We have 2 connectors on the passenger seat and 3 on the drivers seat.

Parking brake handle relocation
If you are installing the driver side seat swivel, the hardest part of this was installing the parking brake handle bracket and cutting the plastic cover. The Alpine Mechanisms instructions got a little vague for this part, so hopefully the following detail will be helpful.

The first thing is to remove the rear cover. This requires a slight tug toward the rear of the van to separate the rear cover from the front cover. There is a grooved channel that connects the two parts of the cover with friction. Next, there is a clip that is pressed in toward the driver seat pedestal. This needs to be pulled directly toward the passenger seat with some sturdy force and the cover will come free.

With the rear cover removed, the bolts holding the brake handle to the pedestal can be removed. The brake handle adapter plate that came with the driver seat swivel can then be installed with the provided bolts. Be sure to torque these bolts at this time as you won't be able to access these bolts later.


Parking brake handle adapter
The brake handle will be lowered by about 2.75 inches and the front of the handle will be angled down toward the floor such that it remains below the level of the seat swivel at all times. This way the parking brake handle will not interfere with the operation of the seat swivel. The next step is to cut the lower part of the parking brake handle front cover away. You'll need to cut about 3 inches off of the bottom of the cover and the cut should follow the angle and contour of the bottom of the cover. It took me a couple tries to get this right. When making this cut, be super careful to not damage the brake cable housing or small sensor wires that are in the vicinity.

Parking Brake Handle
With the front cover trimmed, it is time to align the original bolt holes of the parking brake handle to the welded nuts of the adapter bracket. A tip in the instructions is to put some lubricant on the parking brake cable housing so that it can slide through the grommet in the floor of the van more easily. However, the housing is very stiff. The first few inches slid though the hole fairly easily, but then there was more resistance. It took some force from above to get the housing to push through enough slack to get the brake handle to line up with the adapter bracket. Checking the underside of the van, you'll see that the housing will slide between the fuel tank and the fuel tank protective cover. I didn't need to do anything under the van. I just wanted to be sure that the additional housing beneath the van was not touching anything that moves or gets hot.


Brake Cable Housing
The above pictures show how much brake cable housing had to move. The white indicator on the housing is above the floor in the first picture and the same indicator is below the van in the second picture.
With the brake cable housing out of the way, the brake handle bolt holes can be lined up with the adapter bracket weld nuts and connected using the original bolts.
Rear Cover
The rear cover needs quite a bit of trimming. Space is needed to accommodate the adapter bracket on the inside and the bottom needs to be trimmed away due to the lower position of the handle. Once again, this took several tries.


Reinstall the cover
Once the rear cover is cut to shape, it can be reinstalled in reverse order of the steps for removing it. Align the clip and press it in toward the driver seat and then push forward to align the rear cover groove with the front cover groove and it will sit in nicely.
Locking Pin
The last detail is the locking pin that holds the swivel straight for when you are driving. A nice feature of this locking pin design is that if you turn the pin to the fully unlocked position, the pin stays raised away from the swivel platform and does not drag while turning the seat.


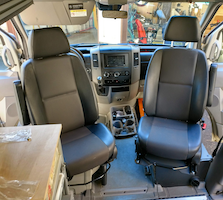
Seat Height
Our overall goal was to have seat swivels that didn't add so much height to the seats...mission accomplished!


Seat swivel operation
The swivels operate smoothly and feel very sturdy. If there is any drawback, and it is very minor, it is that you need to release the locking pin at the back of the seat before rotating the seat. The Sportcraft swivel has the release on the front, making it a one-step operation where this is a two-step operation. This really is a nit-pick.
Worth it?
Was it worth the upgrade when we already had one swivel installed? Definitely!
Pingback: DIY Sprinter Van - Center Console Cupholder - RidingRoadsAndTrails