

8020 Extruded Aluminum T-Slot cabinet
The majority of our Sprinter van build structure so far has been done with 3/4" plywood and no 8020 aluminum extrusions. This has worked out pretty well. The upper cabinet for this latest project is a little different in that it has fewer attachment points to the van and does not touch the floor. I'd been researching different cabinet building materials in vans and kept coming back to folks that use extruded aluminum T-slot, due to the overall look and the strength to weight ratio. The main brand of T-slot extruded aluminum is 8020.
The major downside to 8020 is cost. The basic extrusions cost about 50¢ per inch and the connectors cost between $6 and $35 each. This adds up to a significant investment in materials. Shipping can be expensive considering the weight and some long lengths.
Some of the best resources for building with 8020 in a camper van include these:
8020 Tutorial in Sprinter Forum
The key info for me to be willing to use 8020 for this project is in the 2nd link above where Dave shows you exactly how to easily make your own connectors for just pennies a piece. This reduced my estimated cost of the project by about half.
During my research, one issue that came up repeatedly is how the 8020 company doesn't care how much you spend on shipping and will not take the time optimize the packages for the materials you order from them to minimize shipping costs.
Other decisions with the 8020 extrusions include that there are many variants with how many sides of the extrusion has slots and whether the extrusions are square, rectangular or cornered. Using these different variants can improve the overall aesthetics of the cabinet. I chose to keep it simple and only use the square extrusions with slots on all 4 sides.
The extrusions can also be ordered pre-cut to length. Since my design is likely to change as the build progresses (typical software guy), I made all the cuts on-site from full length pieces.
I spoke with some local 8020 dealers and found one that was willing to help out with bulk pricing and optimized shipping. I placed the order with them and 2 weeks later a truck arrived at my door with a pallet containing about 300lbs of aluminum and no pallet jack in sight.

The packaging was very well done, there is not much chance of damage occurring.
8020 Connectors
Armed with the knowledge of how to make the connectors for the 8020, I sourced the aluminum flat bar and angle bar for the connectors from a local metal supplier. I used the miter saw with an aluminum cutting blade for making the bracket pieces from the bars. I splurged and got a Skil 10" drill press for making the holes in the brackets since precision is important with the brackets to have a nice tight fit with the 8020 extrusions.

Based on the instructional links above, I ordered a good quantity of bolts, carriage bolts and nylon insert locknuts from McMaster Carr.
Assembly
After months of research and design and weeks of gathering materials, it is time to start building. The first steps are to mount the wall and ceiling braces. These are the only 2 pieces that will connect directly to the van. All other pieces will connect to these braces.

From this point, progress moves quickly for a while. The next part of the frame build out is basically like putting together an erector set. As long as the first two braces are parallel to each other, the rest should go smoothly. A key piece of the process here is that with each additional section of 8020 that is added to the structure, access to the t-slot of the existing structure is reduced. This means that you have to know where each carriage bolt and t-nut needs to be placed prior to blocking off a t-slot. Admittedly, I was only moderately successful at this and had to disassemble pieces more than once.


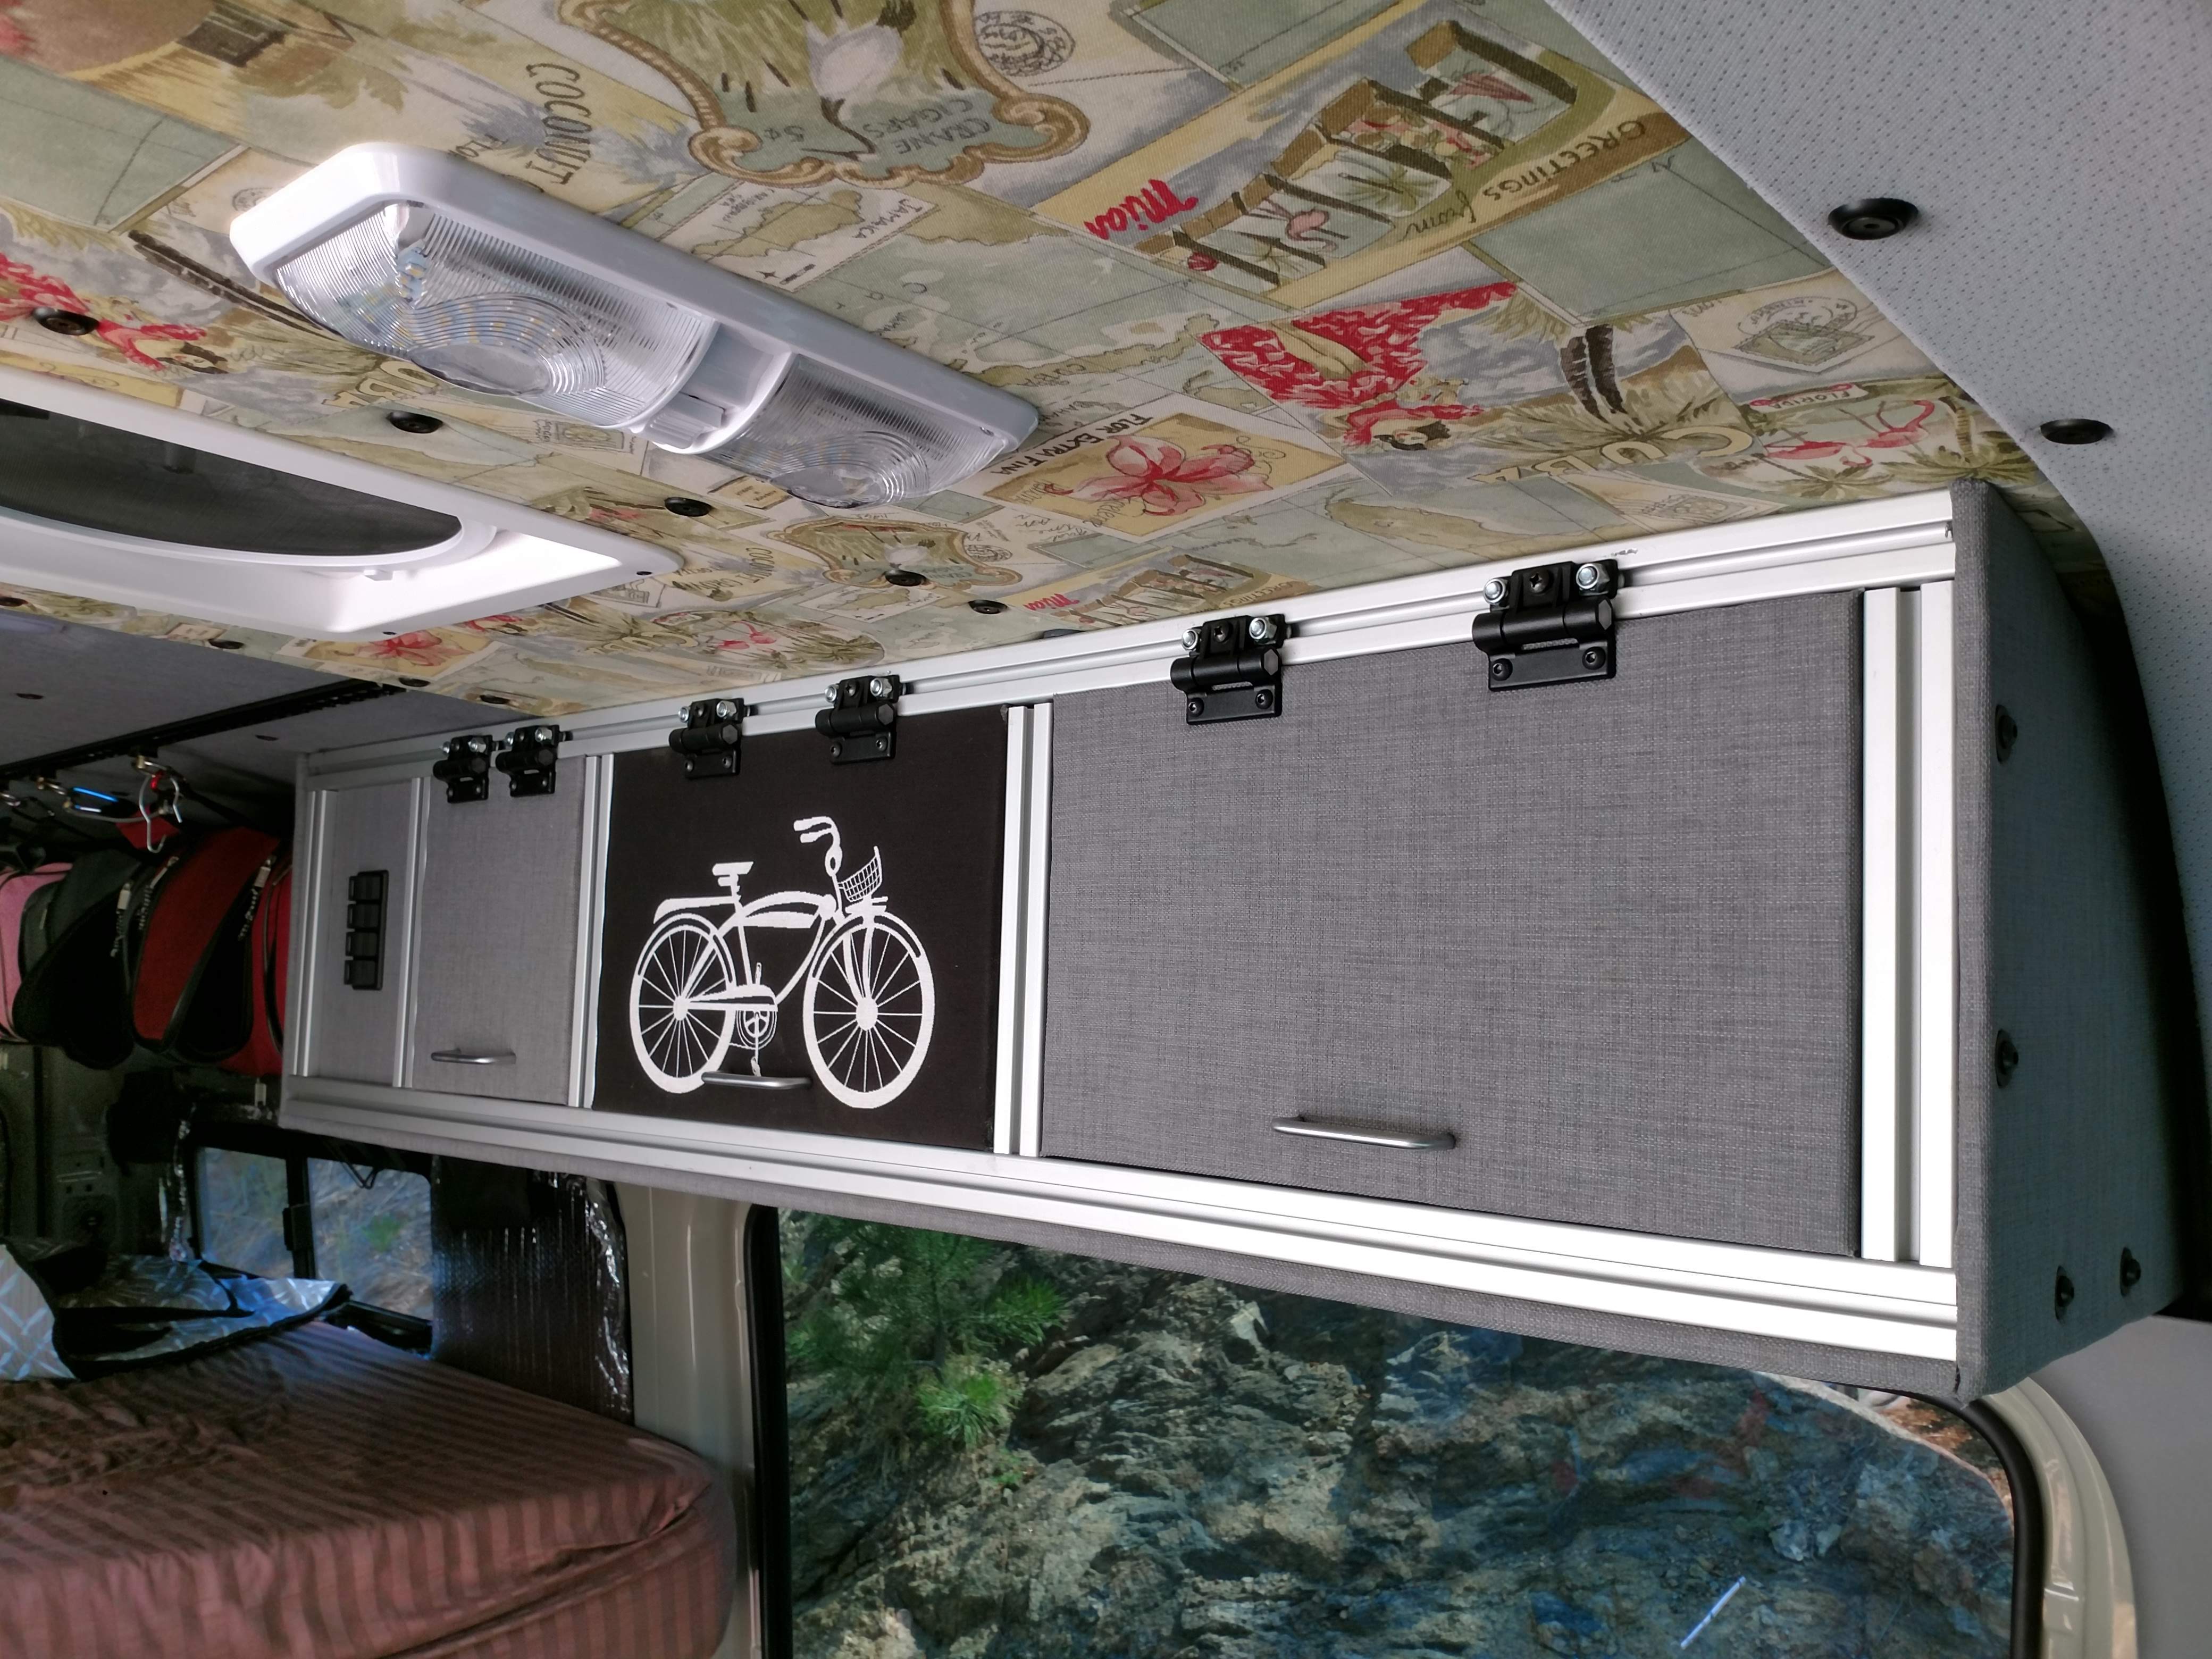
We added a power distribution sub-panel in the cabinet to make the switch locations more convenient for the interior lights and wifi. These Blue Sea switches are quite nice with a good tactile feel and an LED light indicator letting you know that the switch is on. We gave up a little space in the cabinet for this additional distribution panel, but the convenience seemed worthwhile. Prior to starting the cabinet, we ran the wires for the switches from the lower power distribution cabinet we built during the wifi project. These wires ran from that lower cabinet, behind the B-pillar cover and into the wall behind this new cabinet.

The doors were a bigger challenge having little experience in cabinet building. If there is a "right" way to attach doors to a cabinet like this, it is captured in this video. However, that method requires about $100 of hardware for each door and attention to detail that I might not have. I tried a couple of different door styles, sizes and hinge types and finally concluded with doors that are sized to fit within the cabinet frame using friction hinges. The friction hinges hold the door in whatever position you leave it in. They do look a bit bulky, but they do bolt nicely into the slots of the 8020 extrusions.


The door, bottom and side panels are all 3/8" plywood wrapped in closed cell foam and outdoor patio furniture material. The fixed panels are through-bolted to T-nuts that are in the slots of the 8020 extrusion.


With some scrap plywood and material, we added an interior shelf to protect crushables like bread and tortilla chips.

Hi Ross, nice work. Quick question. Am I correct in assuming that you mounted the rails to the wall and ceiling by using aluminum angle? I’m trying to figure out how they’re attached and how you were able to get 90 degree corners out of them considering the angles of the wall and ceiling.
Cheers!
Hi Forrest, I did seem to gloss over that in the write-up. There are PVC spacers that are cut at an angle to match the wall & ceiling angles. The ceiling angle is 2 degrees and the wall angle is 8.5 degrees. The PVC material for making these is listed in the material list. The spacers are cut on an angle using the miter saw. A hole is drilled through the center so the mounting bolt feeds through the spacer. The spacers sit just behind the extrusions at each connection point. Any further questions, feel free to ask. Ross
Ross this is beautiful work. I have a similar design in mind using the ceiling and high wall rib in my Ram Promaster to mount 80/20 and build from there. How did you mount to the van while keeping the exposed t-slot free and clear? Thanks!
Hi & thanks for the note. I have rivnuts installed in all the van ceiling & wall ribs. The rivnuts support all the ceiling panels, wall panels, L-track and 80/20. I drilled holes through the 80/20 with a drill press and countersink bit and used “Hex Drive Flat Head Screws” from McMaster-Carr to fit flush inside the slot through the ceiling panel and into the rivnut. The cabinet has been in place for 2 years and 50,000 miles and nothing has come loose in all that time so far.
Thanks for the reply. Are you using 1/4″ screws or smaller? I’m looking to see the largest size where countersinking the head leaves the tslot unimpeded. It’s getting small enough where I’m worried if I’ll have enough connection points in the ceiling though.
If you are using wood screws or equivalent, #10 will sit inside the countersink of the L-Track. I more often used flathead screws from McMaster like these along with lock washers and nuts: https://www.mcmaster.com/91253A539-91253A539 . They sit just above the countersink in the L-Track but the fittings still can slide by the screw heads.
To mount the first two pieces of extrusion to the van, did you drill holes through the middle of the extrusion? I’m failing to see how you would tighten the hex head bolts otherwise.
Hi Trevor – For the first piece of 80/20 on the wall, I had access to the space between the steel support and the outer skin of the van. In this case I put the hex bolt into the slot of the 80/20 through holes in the steel support and then washers and nylock nuts. The space is roomy enough to to get a wrench behind it to tighten it up. For the ceiling piece, I had rivnuts in the ceiling, holes through the ceiling panel and countersunk holes drilled in the 80/20. I used flathead machine screws through the 80/20 into the rivnuts. Be sure to get the countersink drilled to the proper depth so the screw head does not interfere with whatever you put into the slot of the 80/20. Good luck!
I really like the look of your cabinets! Which hinges exactly did you use? I am currently building 80/20 15 series LS cabinets and I think these are the hinges I would like to use.
Hi Katie, The hinges I used are called “Adjustable-Friction Surface-Mount Hinges” and are available at McMaster-Carr here: https://www.mcmaster.com/catalog/125/3044. Good luck with your build! Ross
Thanks for the quick reply! So you got the black plastic….are they the larger ones or smaller? Just want to be sure they fit the 80/20 ok. There is a 7# torque one and a 35# torque one and they are different sizes.
Hi Katie, Sorry, I thought the link would take you directly to the correct item. I used the 35in/lb variant. If you click on the “product detail” link after selected a part number, it will bring up a drawing that shows the mounting holes on 3/4″ center which aligns perfectly with the 15 series 80/20. Ross
Hi Ross, Great looking cabinets and tutorial. One question, did you consider using 10 series stock? Any thoughts on the smaller 10 series would be appreciated. Thanks, Brad
Hi Brad, I think the 10 series would be fine. If I were to do it again, I would probably use 10 series being lighter and less expensive. The 15 series is ridiculously strong and most likely overkill for my application. Any other questions, feel free. Good luck in your build, Ross
Many thanks. I’ll go with the 10 series and save a few bucks, beer and gas money. Have a great day. -brad
The cabinets look great. I am curious how you attached the bottom of the cabinet to the frame. I see button head screws going through the bottom but am not sure what you used inside the 80 20 slot. It seems like it would be really difficult to line up all of the internal nuts with the button head screws.
Also wondering about weight on the shelves. I was planning on putting the wood for the shelves on top of the frame, not on the bottom.
Hi Bill – I used T-nuts in the slots of the 80/20. The T-nuts slide easily in the 80/20 slots. I’d drill the holes in the panels and use a paper clip to reach through the hole in the panel to slide the T-nut to the precise location for the hole. I’d recommend not getting the economy T-nuts as they cross-thread easily. As for weight, structurally, it is a non-issue, but I like to keep heavy stuff in lower cabinets for overall center-of-gravity efficiency. When loaded, I’m sure each section of that upper cabinet has less than 15lbs of stuff in each one. I can hang my full body weight on the cabinet itself, with no indication of stress on the cabinet.
Thanks for that info. That seems really difficult. Those t-nuts tend to slide around a lot. Did you do the bottom piece in place after you put the cabinet up or build the frame and put the bottom piece on before you set it in place in the van.
Hey Bill – I built the cabinet in place in the van, one piece at a time. So, to answer your question, I had the entire frame installed in the van before adding the bottom & side panels. I had to pre-plan were T-nuts would go as I went along. If I missed any or stripped any, it meant disassembling parts of the cabinet to install/replace T-nuts. One tip I have for the T-nuts is that I would ball up a small piece of duct tape with the adhesive side out and stick it in the 80/20 slot to gently hold T-nuts in place. I hope this helps.
Hey nice breakdown…but how did you secure the first piece of 8020 to the wall of the van to start your frame??
Hi Edwin…The first piece of 80/20 is secured to the wall with carriage bolts and nylon locking nuts. The carriage bolts have their heads in the 80/20 slot and the bolt is then passed through holes in the inner wall of the van where the back of that inner wall is accessible via wrench to allow the nuts to be tightened. Good luck with your build!